 how-to
7 Landscape Photography Styling Ideas for Small Living Rooms
Last Updated: October 25, 2026
Quick Summary
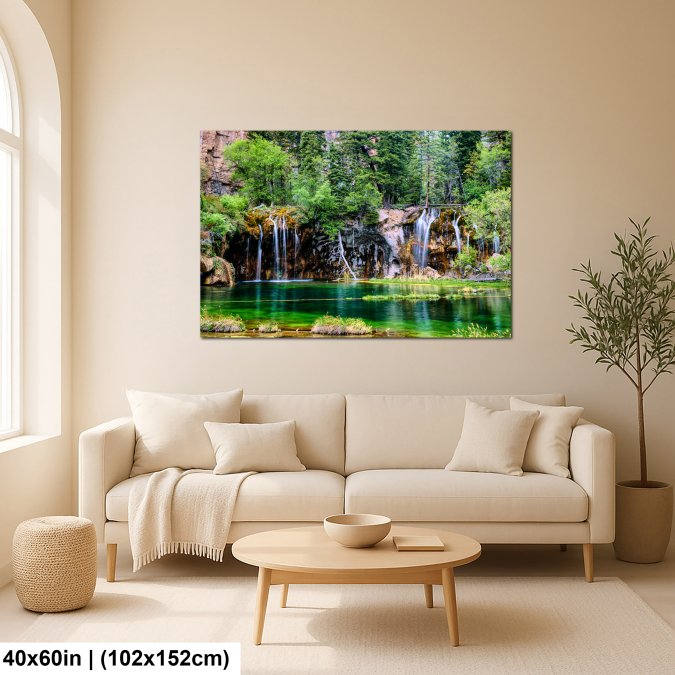
Styling landscape photography in small living rooms starts with picking one focal point, then sizing the print to your furniture rather than the wall. Hang a single statement piece that spans about two-thirds of the sofa's width, and choose wide horizons or open skies to make the room feel larger.
- Hang one statement piece instead of several small prints, keeping 15 to 20 centimeters of clear wall between frames.
- Size wall art above a sofa to about two-thirds of the sofa's width, roughly 75 to 90 centimeters for a two-seater.
- Hang the center of the artwork at eye level, about 145 to 155 centimeters from the floor.
- Build a small gallery wall on a tight 2x2 or 3x2 grid with matching frames to keep visual clutter down.
- Choose anti-reflective glazing, matte paper, or canvas and metal prints to avoid glare in compact rooms.
Table of Contents
- 1. Pick a Focal Point Before You Hang Anything
- 2. How to Arrange Art in a Small Living Room
- 3. The Best Size Wall Art Above a Sofa
- 4. How to Create a Small Living Room Gallery Wall
- 5. Living Room Landscape Photography Ideas That Open Up the Space
- 6. Lighting, Glare, and Print Materials for Compact Rooms
- 7. Renter-Friendly Installation Without Damaging Walls
- Choose Your Print and Plan Your Wall
- Frequently Asked Questions
1. Pick a Focal Point Before You Hang Anything
The biggest mistake in styling landscape photography in small living rooms is hanging art before choosing a focal point. A focal point is the spot your eye lands on first when you enter a room. In a compact space, that anchor decides everything else: furniture placement, print size, and hanging height.
Most people start with the sofa and work outward. We recommend the reverse. Choose the wall first, then build the room around it.
- The sofa wall: best when the sofa sits against a solid wall with no windows
- The fireplace or mantel: a natural anchor if the room has one
- A blank wall opposite the entry: strong for a single large fine art print
- A tall narrow wall: good for a vertical stack of two or three prints
One focal point per room. Two competing anchors make a small space feel busy and cramped. If your living room already has a strong architectural feature, like a bay window or exposed brick, let that feature lead and keep the art quiet around it.
2. How to Arrange Art in a Small Living Room
How to arrange art in a small living room comes down to proportion and breathing room. Hang one statement piece rather than several small ones. Keep at least 15 to 20 centimeters of clear wall between frames, and leave negative space around the group so the eye can rest.
A few rules that hold up in practice:
- Center art on the furniture below it, not on the wall alone
- Keep the bottom edge of a large print roughly 15 to 25 centimeters above the sofa back
- Let art fill about two-thirds to three-quarters of the furniture's width
- Group odd numbers of prints; three or five read better than four
A common mistake is sizing art to the wall instead of the furniture. A print that looks generous on an empty wall can look lost once the sofa arrives.
3. The Best Size Wall Art Above a Sofa
The best size wall art above a sofa is one that spans about two-thirds of the sofa's width. For a standard two-seater, that means a print around 75 to 90 centimeters wide. For a three-seater, aim for 100 to 120 centimeters.
Hang the center of the artwork at eye level, roughly 145 to 155 centimeters from the floor. Above a sofa, the bottom edge should sit 15 to 25 centimeters above the backrest.
Sofa Width | Print Width | Hanging Height (center) |
|---|---|---|
150 cm (two-seater) | 75-90 cm | 145-155 cm from floor |
180 cm | 90-110 cm | 145-155 cm from floor |
210 cm (three-seater) | 100-120 cm | 145-155 cm from floor |
4. How to Create a Small Living Room Gallery Wall
To create a small living room gallery wall, start with a tight grid rather than a scattered layout. Small rooms reward order. A 2x2 or 3x2 grid of same-size frames reads calm and keeps visual clutter down.
Steps that work:
- Cut paper templates to each print's exact size
- Tape them to the wall and live with the layout for a day
- Mark frame centers with a pencil
- Hang the center frame first, then work outward
- Step back after each frame to check spacing
For a deeper walkthrough, see our guide on how to curate a gallery wall. If you want to preview the arrangement before buying, our article on visualizing art in your home before buying covers mockup tools.
Mix one or two larger prints with smaller ones so the group has a clear anchor. Keep all frames the same color; matching frames do more for a small room than matching subjects.
5. Living Room Landscape Photography Ideas That Open Up the Space
The right living room landscape photography ideas make a compact room feel larger. Wide horizons, open skies, and distant vistas create depth. A single expansive scene on a focal wall acts like a window into another place.
- Wide horizon shots: stretch the eye sideways, making the room feel wider
- Misty forests and fog: soft tones add calm without visual noise
- Coastal and desert scenes: pale palettes reflect light and brighten a dark corner
- Vertical waterfall or canyon prints: use height to draw the eye up
At LarryCoulsonPhoto, our collection spans landscape, cityscape, nature, and travel prints, so you can match a scene to your room's mood.
Avoid busy, high-contrast images in tight rooms. Too much detail competes with your furniture and decor.
6. Lighting, Glare, and Print Materials for Compact Rooms
Glare is the quiet enemy of landscape photography in a small room. Glass frames catch window light and wash out the image. Choose anti-reflective glazing or frameless acrylic if your art faces a window.
A few material choices that help:
- Matte or satin paper: reduces reflections compared with glossy stock
- Museum-grade pigment inks: resist fading better than dye inks
- UV-filtering glazing: protects color over time
- Canvas or metal prints: no glass, so no glare
Keep prints out of direct sunlight and away from heat sources. For more on protecting your pieces, read our guide on how to protect photography prints from fading.
7. Renter-Friendly Installation Without Damaging Walls
Renters can hang landscape photography without losing a deposit. Adhesive strips and hooks hold lightweight frames securely and lift off cleanly when you move.
Options that work:
- Adhesive picture strips: good for frames under about 3 kilograms
- Adhesive hooks: pair with wire or D-rings on the back
- Leaning shelves: rest framed prints on a picture ledge, no holes needed
- Freestanding easels: ideal for a single print on a console
Check each product's weight rating before you hang. Heavy frames still need a stud or a proper anchor. For a full rundown of methods, see our article on how to hang art without damaging walls.
If you are still choosing pieces for a compact space, our guide on how to choose wall art for modern apartments covers the wider picture.
Choose Your Print and Plan Your Wall
The challenge with a small living room is making one wall do a lot of work. Pick a single focal point, size the print to your sofa, and choose a scene with open depth. That combination does more than any crowded gallery ever will.
LarryCoulsonPhoto offers fine art prints across landscape, cityscape, nature, travel, and abstract styles, each made to bring atmosphere into a compact space. Browse the collection and pick the print that anchors your wall.
Get started with LarryCoulsonPhoto and turn a small living room into a room with a view.
Frequently Asked Questions
How do you arrange landscape photos in a small living room?
Start with one focal point, usually the largest wall or the space above your sofa. Hang a single large landscape photography print centered at eye level, about 57 inches from the floor to the center of the frame. If you prefer multiple pieces, use a tight grid or a horizontal row with 2 to 3 inches between frames. Keep the arrangement compact so it reads as one visual unit rather than scattered wall art.
What size landscape print works best in a small living room?
For a compact space, a single statement print between 24x36 and 30x40 inches works well above a standard sofa. The art should span about two-thirds to three-quarters of the furniture width below it. If you are building a gallery wall, mix 8x10 and 11x14 prints in a tight cluster. Avoid oversized pieces that crowd the wall or tiny prints that get lost in a small room.
Can a large landscape print make a small room look bigger?
Yes. A large landscape photography print can create depth and draw the eye outward, especially when the image shows open skies, distant horizons, or receding paths. The key is proportion: the print should relate to the furniture below it and leave breathing room on either side. One well-scaled large print often makes a small living room feel more expansive than several small pieces.
Is one large print or a gallery wall better for a small living room?
One large print is usually the safer choice for a small living room because it reduces visual clutter and creates a single strong focal point. A gallery wall can work if you keep it tightly composed and use a consistent frame style. If you rent or want flexibility, start with one large landscape photography print and add smaller pieces later as you refine your living room landscape photography ideas.